


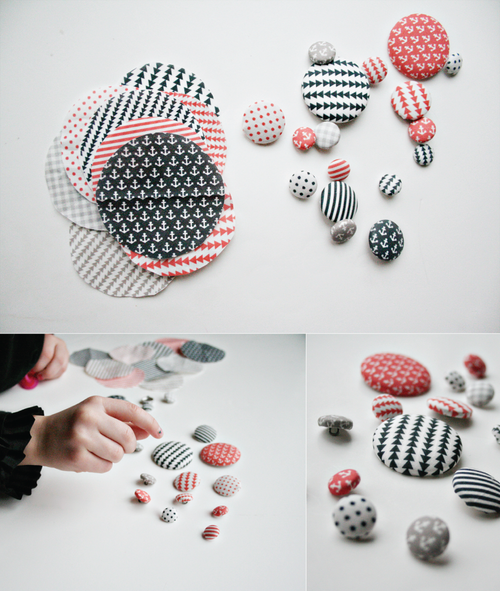
We’re so excited to share a tutorial from Rae Friis at Armommy on how to make fabric-covered buttons from a fat quarter of pretty patterned circles, and then use them in assorted cute projects. Enjoy the DIY ideas that Rae shared with us below!
Rae: Today’s post is all about buttons! If you haven’t made these fabric-covered cuties before, you are in for a real treat. Why do I love them so much? They’re super-easy to make, require few supplies and once you’ve finished making some, there are endless ways to use them. I’ll get into some project ideas in a bit, but first a button-covering tutorial…
SUPPLIES:
- fabric scissors
- this fat quarter of button patterns (as pictured) or scraps
of fabric with small patterns - a button-making kit (You’ll need one for each size button you want to make.) My local craft store doesn’t have much of a selection, so I shop for mine on Etsy, just search for “button kit.”

INSTRUCTIONS
NOTE: Each button kit includes a mold & pusher along with the button shell and back. You will also find a pattern on the back of the packaging so you know how big to cut your fabric. The button pattern on our fat quarter is made for a 1 ½-inch button. To make a smaller button, just trace and cut around the pattern that came with your buttons!
- Get out your supplies. Using the button template, cut the fabric to the appropriate size.
- Place the button shell over the center of your fabric and lay on top of your button mold. (Our mold is white here.)
- Using the pusher (ours is blue), push the button shell into the mold. Then tuck the raw fabric edges into the shell and place the button back over the top.
- Next, use the pusher again to secure the button back. Push hard! Finally, turn the mold over and pop your new button out!
So cute and simple, right? And like I said, once the buttons are covered there are so many ways to use them.
Here are some ideas!

DIY BUTTON EARRINGS
SUPPLIES:
Fabric covered buttons (12mm), pliers, Crazy Glue (or other similar glue), earring findings (found in the jewelry section of the craft store or on Etsy). If you or the person you are making these for don’t have pierced ears, look for a clip-on earring back to glue on instead!
DIRECTIONS:
1. Use the pliers to remove the loop from the back of each button.
2. Glue the earring findings to the back of each button and let dry.
3. Wear or gift with pride!

DIY TUFTED PILLOW
SUPPLIES:
Large fabric-covered button, tufting or large doll needle, non-stretchy thread or floss, a pillow that needs some tufting, a pencil.
DIRECTIONS:
1. Using a pencil, mark the front and back center of your pillow with a small dot.
2. Thread the needle. If using a thin thread, double it up a couple of times to make it stronger. (I used 4 strands.)
3. Poke the needle through your marks, back to front.
4. Thread the button onto the needle and then back through the pillow. Repeat steps 3 & 4. Cut the thread from your needle and pull the ends of your thread taught so the front is tufted, then tie off!
5. Find a cute place for your newly tufted pillow!

DIY BUTTON NECKLACE (Perfect for anylittle ladies in your life!)
SUPPLIES:
Ribbon or shoelace, fabric-covered buttons in a variety of sizes, hot glue gun, felt and scissors (optional).
DIRECTIONS:
1. Arrange your buttons and hot glue them into an arrangement that pleases you. Let dry.
2. Thread the buttons onto a ribbon or shoelace.
3. If you wish to keep the buttons from moving around (as in a bib necklace), then cut felt rounds to the size of the buttons and hot glue them over backs of the buttons to hold them in place on the ribbon. (not pictured)
And last but not least…

A DIY CIRCLE GARLAND
If you have leftover fabric circles from our fat quarter, this is a great way to use them!
Like most DIY’s, there’s more than one way to skin this cat. For those that are spatially challenged while sewing (like me), here’s a good method.
SUPPLIES:
Sewing machine, thread, strips of lined paper about one-half to one-inch wide (they don’t need to be precise), glue stick, cut fabric circles
DIRECTIONS:
1. Run the glue stick down one long edge of the lined paper strips. (You’ll be stitching down the middle of the paper strips, so gluing along an edge will keep your needle from getting sticky.) Arrange the circles along the paper so they are spaced evenly. (We fit 4 circles per strip.)
2. Head to the sewing machine and sew down the center of your circles and the strips they’re attached to. Continue feeding each strip through until they are all sewn together.
3. Carefully tear the lined paper strips from the backs of your circles and hang your new garland!
Phew, that was a lot of fun! I hope you enjoyed our fabric-covered button tutorial and DIY projects! We’d love to know (in the comments below) how you would use your fabric covered buttons.
Thanks so much for “hangin’” with me on Spoonflower!
Xo . Rae


Awesome and fun projects and tutorials!
I have been making buttons like this for years, and they are always so instantly gratifying with such little effort!
I make book marks from mine with giant paper clips and buttons, and I also make rings,hair ties and headbands, amongst other things with the hand made fabric covered buttons! — Other fun things where buttons are the main focal point are always popping into my head, or hands!
Love the garland! — What a fun idea, and creating them with other shapes would be exciting as decor for parties and such.
Thanks for a being a source of inspiration and fun, both spoonflower and bloggers such as Armommy!
^_^