


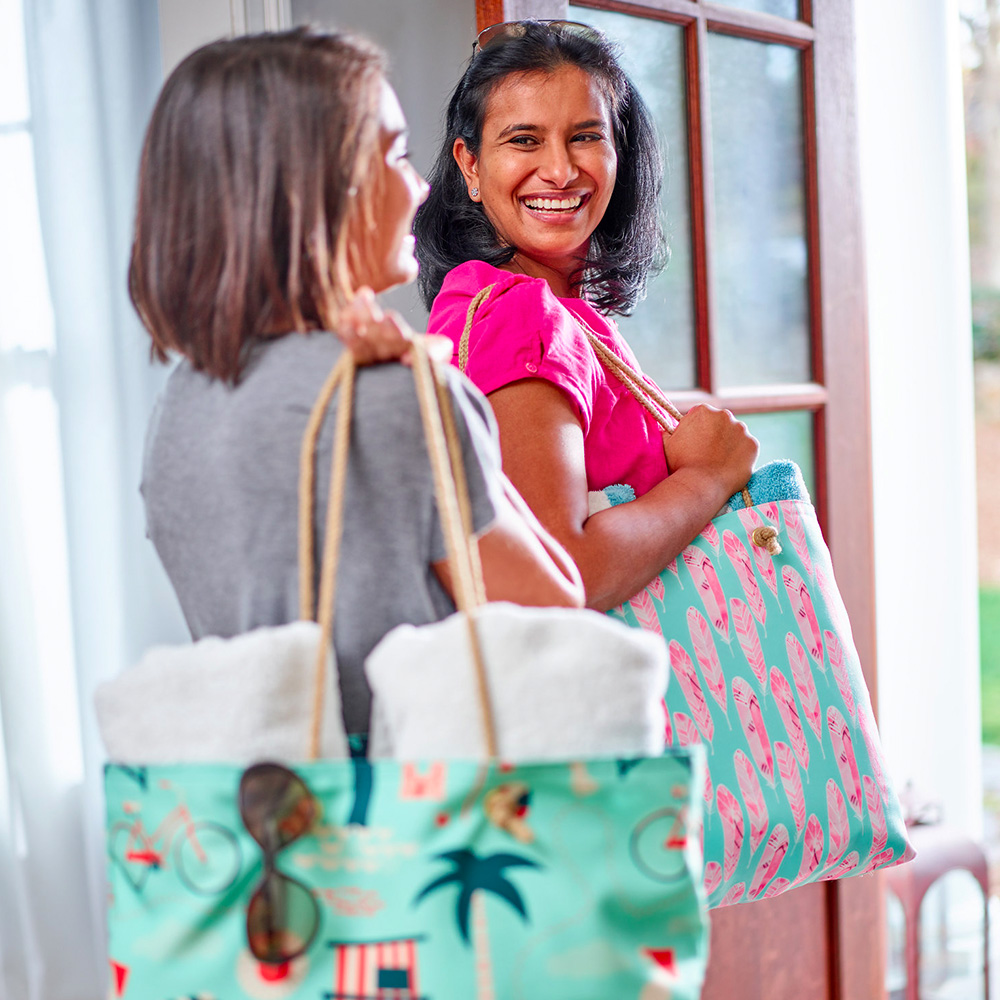
We recently added a new durable, eco-friendly canvas fabric to our line, Recycled Canvas! Recycled Canvas is a 100% polyester fabric offering a smooth drape, soft hand and radiant color saturation with a subtle luster. The canvas prints colors vibrantly and is heavy duty enough for a wide variety of projects, just like this fun beach tote from Sara of Radiant Home Studio. Read on to learn how to sew this versatile carryall!


Hello! I’m Sara. I design and sell bag sewing patterns, share craft and sewing tutorials, and explore printing and surface design on my blog Radiant Home Studio. A couple of years ago, I stumbled upon Spoonflower as I was searching for the perfect fabric for one of my bags. I taught myself to make repeating patterns and quickly became hooked, designing fabric in my “spare” time.
As a bag designer, the Recycled Canvas fabric had me curious—durable, sturdy, custom printed, and eco-friendly—sign me up! I’ve designed a simple tote bag using the Recycled Canvas. The fabric is water resistant and easy to wipe clean. Paired with this big tote, you’ll have the perfect bag to haul all of your stuff to the beach or the park. Already back to school? This tote is big enough to haul sports gear and library books too!
This bag has one full-width pocket, which is divided into 3 sections. If you want more pockets, just repeat the pocket directions for the other side of the bag! The fun rope handles are simply threaded through grommets and knotted. I’ve included detailed directions for attaching the grommets, and a simple alternative (button holes) if you prefer.
The Recycled Canvas fabric was easy to work with. Though it has a bit of sheen, the texture keeps it from sliding around while you are sewing. It’s also thick enough to make a durable bag, but not so thick that you’ll have trouble sewing through multiple layers of fabric. The biggest challenge I found with the fabric was getting the iron temperature hot enough to press creases in the fabric, but not so hot that it would damage the fabric. The “synthetic” temperature setting on my iron was just right, once I allowed the iron to fully heat up. In order to produce straight topstitching, you’ll need to stitch slowly, pinching the fabric into place if the pressed creases are not holding. The topstitching will hold everything into place and keep the edges looking neat and professional.
Let’s get started!
MATERIALS
- Exterior – 1 yd. of Recycled Canvas (I used Cactus Cacti Garden by LittleSmilemakers)
- Lining – 1 yd. of Recycled Canvas (I used Cross Line Mudcloth by Holli Zollinger)
- Rope – 2 yds. of 1/4″ rope
- Coordinating thread
- Grommets – size 7/16″ (optional, use a button hole in place of grommets if you choose)
- Hammer – to set the grommets
- (You’ll also have some fabric leftover for another project!)
Cutting measurements:
- Exterior – cut 2 pieces, 22″ x 18″
- Lining – cut 2 pieces, 22″ x 18″
- Pocket – cut 2 pieces, 22″ x 8″
Finished Size:
About 18″ square, with 12″ handles.
Notes:
- All seam allowances are 1/2″ and included in the given measurements.
- Press all seams with your iron temperature set for synthetic fabric.
Cut out your pattern pieces using the measurements provided above. You may find it helpful to use a rotary cutter and mat to produce straight lines and right angles.

Locate the pocket pieces. Place them right sides together and stitch across the long edges of the fabric, leaving the short ends open.

Turn the pocket right side out and press.

Topstitch along the folded side at 1/8″ and 3/8″ from the edge. This is the top of the pocket.

Place the slip pocket across the right side of one of the lining pieces. The top edge of the pocket should be 6″ below the top edge of the lining piece.

Baste the pocket sides to the lining sides in the seam allowances (about 1/4 ” from the edges).

Topstitch the bottom pocket edge to the right side of the lining.

Mark two vertical lines on the pocket, dividing the pocket into 3 sections.

Stitch along the lines, from the bottom of the pocket to the top of the pocket to avoid puckering, backstitching at the top edges to secure the stitching.

One side of your lining should now look like this…

Place the lining pieces right sides together. Check your pocket orientation to locate the top of the bag. Stitch along the other 3 sides leaving a 3″ gap at the bottom center of the bag.

Flatten the bag so that the side seam and bottom seam are aligned. On the corner, measure in 2″ and draw a line. Repeat on the other corner.

Stitch along the lines in the corner of each bag, backstitch at each end, and trim the excess.

That seam will make a square bottom on your bag, and it should look like this when you open it up.

Place the exterior pieces right sides together and stitch along 3 sides, leaving one of the 22″ edges open.

Square the corners of the exterior as you did for the lining.
Place the exterior inside the lining with right sides together. Match the side seams and stitch around the top edge.

Turn the bag right side out through the small opening in the bag lining.

Topstitch around the top edge of the bag at 1/8″ and 3/8″.

Use chalk to mark grommet placement. Holes should be centered 6″ apart, and 1 1/2″ below the top edge.

Grommet kits come with 4 different types of pieces. The tools are the anvil and setter (the long piece).

Each grommet is made up of two pieces. On the left is the stud and on the right is the washer.

To insert the grommets, you need to cut a small hole the size of the inner circle. First, fold your fabric and carefully snip a hole (through both layers) in the center of the circle.

Snip perpendicular to that cut, forming a small plus sign. Then trim the area in the center. A perfect circle is not necessary. And remember that it is always better to make the hole too small than too big!

Push the stud through the hole.

Turn the fabric over and slide the washer (teeth side down) onto the stud.

Place the anvil on a hard surface (concrete is best, so you’ll probably need to step outside), with the stud side of the grommet resting on it. Place the setter into the hole and hit it with a hammer a few times.

Repeat for all four grommets.

Decide how long you want to make your handles. I used 30″ of rope for each handle, but you can make them longer or shorter depending on your taste.
Insert one end of your rope through one grommet from the inside.

Tie a knot and pull it tight.

Before you tie the last knot, make sure your handle lengths are even. You don’t want to be carrying around a lopsided bag after all of that hard work!

Almost done! Don’t forget to hand stitch that little hole in the lining closed!

That’s it! Pack it up and head out on an adventure somewhere!
About Our Guest Author
 Sara is a wife and homeschooling mother of 6 children. She loves all types of creative work and frequently experiments with sewing, crafting, printing, art, and design. Sara and the kids recently participated in the month long #spoonchallenge. You can find their art on Instagram, fabric designs at her Spoonflower shop, and more tutorials and sewing patterns at Radiant Home Studio.


The bag looks very young!
I recently bought eco-canvas for the first time to make a carry tote. I love the fabric but admittedly it baffles me a bit. I noticed you lined your tote with eco-canvas. Is this necessary or does the shape hold up well with cotton? What do you recommend? Thanks so much and I am looking forward to your reply!
Hi Chris,
Great question! While the Eco Canvas is sturdy, we suggest lining the bag to hide any exposed seams as well as give it a little extra structure.
You do a fantastic job with your totorial the easiest and best I’ve see thanks
very cool information to make our self a tote bag. Thanks for sharing.
This information is very useful to us….!!
Thank you so much for sharing this cute pattern! I just need one.
Transparent bags, especially purses, are getting popular. It’s definitely a power statement to have to confidence reveal to the world everything you’re carrying.I only saw it once at:
http://www.amazon.com/dp/B00LBUYZK4
Lovely bags
Love your bag. Thanks so much for the tutorial.
Great detailed instructions for a fabulous bag.
Thanks so much, I will have to give it a go with the new Eco canvas.
Love it.Just beautiful!!
WOW! SEW SIMPLE!! Thanks! :O)
I love it !!