


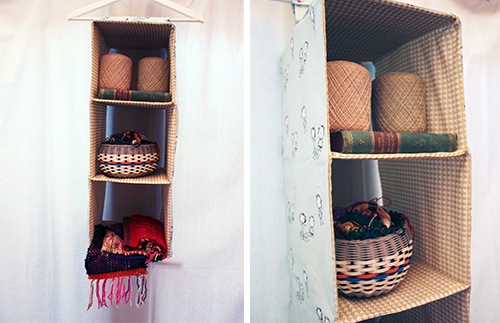
We devoted the month of January to sharing projects to inspire us to transform those unloved items in our homes into treasures and to reorganize our spaces beautifully. Anda from the Etsy Europe team shares a final brilliant organizational DIY, fabric hanging shelves.

You’ll need:
- one yard inner fabric in Spoonflower linen-cotton canvas
- one yard outer fabric in Spoonflower linen-cotton canvas
- two 20cm lengths (7.5”) of 5cm wide velcro (2”)
- four 20x30cm (7.5” x 11.5”) pieces of fiber board, lightweight particle board, or 900+ weight cardstock
Note 1: I live in Europe, and all the rulers in my house are in centimeters, so I created this tutorial in metric. For best results, please measure in cm! I tried my best to convert all measurements to inches anyway, in case you don’t have a way to convert on your own.
Note 2: I didn’t have any velcro when I took photos so I faked it with felt. Please use real velcro or your shelves will just fall off the closet rod! 🙂
Cut fabric:

12 pieces 23x32cm (9”x12.5”) rectangles of inner fabric, for interior of shelves

2 pieces 23x32cm rectangles of outer fabric, for top and bottom of shelves

2 pieces 20x23cm (7.5”x9”) rectangles of outer fabric, for hanging strap
2 pieces 32x69cm (12.5”x27”) rectangles of outer fabric, for outer sides of shelves
All seams are 6mm (1/4”)

Create the hanging strap (use the 20x23cm squares):
With right sides together, stitch around hanging strap, leaving an opening large enough for turning. Trim corners. Turn right side out and press. Slip stitch opening closed.

Sew one side of velcro at one end, flip over and sew other side of velcro at opposite end.

Find center of the top outer fabric piece and measure 1cm from center in each direction and mark. Do the same with hanging strap.

Pin down and sew two straight lines to attach hanging strap to top piece of shelves. You probably want to sew over these lines a few times for security.
Create the top of the shelf (the outer 23x32cm piece you just attached the hanging strap to, and one inner 23x32cm piece):
Press under 1.5cm (3/4”) on back edge of top shelf piece and inner shelf piece.

With right sides together, sew a straight stitch across opposite side (the front edge of the shelf).

The longer edges of the top shelf should still be open.

Flip top shelf right side out and press. Center an inner piece along one side of top shelf, so its right side is facing the right side of the bottom of the top shelf. There should be around 1cm fabric extending past the front and back of the shelf. Stitch along this side. Repeat on opposite side with a second inner rectangle.

You should end up with something that looks like this.
Create more shelves (inner fabric 23×32 pieces):

Take two inner fabric pieces and repeat step 2 to make the second shelf. (First press 1.5cm under on back edge of each side, and then with right sides together stitch across front edge.)
Attach this shelf to the side pieces of the first shelf by facing the right side of the top of shelf to the right side of each inner piece above it and straight stitching along this edge.
You’ll always have about 1cm extra fabric extending past the front and back of the shelves, and will need this later when adding the outside.

Attach two more inner side pieces. Make sure you have the front of your shelves all at the front— you’ll be sliding fiber board into the open backs of each shelf at the end.

Repeat steps with next shelf. Repeat steps to make the bottom shelf, only this time use your second outer fabric 23x32cm piece for the bottom of the last shelf. Press everything. You’ll have something like this (seen from the bottom).
Add the outer sides:


Flatten out your shelves.

Face and pin the right side of one long 32×69 rectangle to the top & edges of the right side of one inner part. Everything else will be in the middle.

Straight stitch around this edge—you’ll have a sort of lumpy sandwich. Be careful not to catch the finished shelving fronts and backs as you sew this part.

Straight stitch around sides and top, leaving the bottom open. Turn right side out and repeat with second outer piece. Turn right side out again, and start to get excited because it looks almost finished and it’s kind of magical.

Slip stitch the bottom of each outer piece to the bottom shelf piece. Press!
Finish:

Slide your fiber board into the backs of your shelves and slip stitch the backs of shelves closed. Holy moley, you made some hanging shelves! In the photo I have the hanging strap wrapped around a coat hanger, but the strap will work best when wrapped around a bar in your closet. Be sure to use strong Velcro if you plan on hanging lots of heavy stuff. Now fill it with sweaters and underthings or whatever you like! You’re done!
About Our Guest Blogger

Anda Corrie is an American illustrator, Etsy designer, and émigré living in Berlin, Germany with her small family. In her spare time she obsesses over vintage children’s books, makes homemade schnapps, sews tiny dresses that her 4-year-old stubbornly refuses to wear, and draws. Visit her Spoonflower shop for some lovely hand drawn fabric designs and her Etsy shop, Boosterseat.


A suggestion for the stiffener: in lieu of cardstock or particle board, one of the thinnest and most stable wood products I’ve found is faux-wood paneling. Paneling has fibers like plywood, running at right angles to the next layer and so on, it and remains stiff and is somewhat water/humidity resistant. Particle board is useless if it gets a little wet. People often remove paneling when remodeling, so if your neighbors throw some out, grab it. I’ve used it for sturdy signage, drawer dividers, a tablet folio, and much more. It’s also great to use to drag heavy furniture on without scratching floors (place an old tarp or blanket down, put the paneling onto it, and get someone to help set the heavy item onto the paneling. The blanket or tarp will be easy to drag on a hard floor by grabbing a corner or two, and the paneling will help keep the heavy item from digging into the flooring or hanging up on transitions between different height floorings. I will definitely use some when I sew this closet organizer.
Thanks for sharing your knowledge on this, T!
Best,
Betsy
Spoonflower
Hi ,
I tried this closet and came out good…thank u for wonderful tutorial
https://www.facebook.com/ShubhaCraftyCorner/photos/ms.c.eJw9yrENACAMA8GNkEkcHO~_~;GEUE5emfJrfbMKisxXGqtAk9ByMb~_v3M3xee3Azy.bps.a.417930648553660.1073741832.230481743965219/494419860904738/?type=3&theater
I didn\’t understand the outer finishing part …after fattening of shelves .
I have shared your tutorial on my page…:-)
Would it work to make this with six shelves?
Great tutorial…thanks!